
Let’s start at the beginning, to understand why and how we can optimize WordPress to make our web or blog in WordPress load much faster and consumes less resources on the server, with the consequent advantages that that means in all aspects.
With the improvement in loading speed we get better usability for users and also take better advantage of the crawl budget allocated by the Google crawler, and with the reduction in resource consumption, we save infrastructure costs (hosting or server) and at the same time reduce the possibility of having problems in traffic spikes.
In this article we will try to explain, point by point, practical techniques to improve the loading speed of any website. From the implementation of a good caching system to the ideal server-level environment for your WordPress website to work quickly and consume few resources at the same time.
Before going directly into what is WordPress optimization, let’s discuss some “basic theory” about WordPress and how it works. If you are an advanced user of WordPress you could skip this part, but I still recommend you read it.
The WPO (Web Performance Optimization) theme can be seen in different ways depending on the point of view. What I see in one way, another person may see it in a completely different way or even have a much better method than mine to gain more loading speed while improving a lot more resource consumption.
How WordPress works
Before we get directly into WordPress optimization issues, let’s try to explain and make clear how WordPress works.
WordPress is a CMS developed in PHP and uses a MySQL database to save the data (although you can also use SQLite databases using an external module), that means that WordPress works more or less like any other CMS developed in PHP.
Although WordPress is a CMS that was created in 2003, technically its structure is still well planned.
If we think about implementing a forum or a community using WordPress and a plugin like bbPress or BuddyPress we may notice a problem in the way to structure the data in the database, especially in very large websites with a lot of data to save and many visits, but this does not mean that it is not enough for most websites.
The operation of WordPress is simple, if we do not take into account the cache systems and other mechanisms that influence or can influence the load, simply runs PHP code that consults data in the MySQL database to build an HTML page that is then shown to the user or visitor in your web browser.
WordPress loading speed
WordPress is not a slow CMS, but if we load a lot of plugins and a heavy theme into it, it may become a VERY slow CMS. We must bear in mind that this is not the fault of WordPress, but it is the fault of the webmaster who is developing the website.
Although WordPress is very easy to use, we must have notions of web development and the way in which they load the elements of a website, since in most cases the problems of slowing down and slow loading speed are due to the fact that the developer of the website did not take into account basic things when it came to layout the content or build the website, that is, the problems do not come from WordPress itself but from what has been tried to do with it.
One of the main reasons we want WordPress to load fast is usability for visitors.
We must bear in mind that they also influence many other things (without even entering the subject of resource consumption) because a good loading speed can help us to have a good positioning in search engines and that we take advantage of the crawl budget allocated by Google to our website.
Although you can not always get such good results in terms of loading time as in the case of the image above, we must be able to distinguish what are the reasons why our website is slowed down and we must be able to solve these bottlenecks, or at least, is one of the things we will try in this article, we will teach you to accelerate WordPress to load faster.
WordPress Resource Consumption
The only reason to optimize WordPress is not to get a good loading speed, usability improvement or improvement in the crawl budget, but optimizing WordPress we can also get a reduction in resource consumption of the installation of WordPress, especially when we talk about website with high traffic or websites with peaks of traffic that can give us quite a few problems on the server.
There are cases where applying caches correctly we can mitigate the load and we can also make the content be served much faster to visitors, so we get two things at the same time: a better loading speed and lower consumption of resources.
Normally when we try to get a good loading speed, most WPO techniques are applicable to most WordPress websites.
In the case of reducing resource consumption the thing changes, as each solution must be applied in a specific way with specific parameters and taking into account the environment (server configuration, server hardware, etc …).
Factors influencing loading speed
There are many factors that directly influence or impact the loading speed of the website.
Some factors we can control and others how many we can not control them or can even become unknown.
We can group the factors in three main groups:
- The factors that depend on networks and connections to the Internet: Normally we cannot control them nor are we going to comment on them in this case.
- The factors that depend on the server: We can intervene and even prevent them, but it depends a lot on the circumstances .
- The factors that depend on the website: In this group we group the factors that depend on the bad architecture of the web and those that depend on a bad configuration or simply lack of foresight.
Evidently the first ones we can’t do anything for them and to detect them we must know a little about how Internet works, the good news is that they are the less common ones and that normally except isolated cases, they tend to be very variable (they come and go sporadically).
In the case of the server, it depends a lot on the Hosting or Server. A dedicated server is not the same as a VPS Server or a Shared Hosting.
If you combine a good Linux sysadmin with a good dedicated server you will be able to discard completely the second group of factors.
Finally, the last group is the one we are going to deal with in depth, especially at the configuration level. We will try to disassemble and show some concepts that if we apply them, we will get websites that load very fast and consume few resources.
All this from the point of view of logic and feasibility of the project.
The visitor’s web browser is not the best tool to test the loading speed of a website, since the connection can be very variable and in very few cases, we can say that the Internet connection and its variations have not influenced between the testing of one website and another.
There are online services with which to test the loading speed.
The advantage is that these online services perform the tests from servers where the speed of the Internet connection and latencies are not usually a problem, and they usually choose the location of the test so that it can be done from the geographical area closest to the server where the website is hosted.
On the other hand, there are also plugins that allow us to test and compare the speed of our WordPress with other WordPress installations installed on other servers.
If I had to choose my favorite tool to test the loading speed of a website, I would choose Pingdom Tools, because I personally like it the most and I use it both to measure the loading speed and to detect loading problems, bottlenecks or blockages.
Pingdom Tools

As I said before, Pingdom Tools is my favorite tool to test the loading speed of a website. The bad thing is that it only allows testing the loading speed externally, with Pingdom Tools we can not test the impact that has the loading of the web on the web server.
Pingdom Tools allows us to choose the location from where we perform the load test, (make it from a geographical point close to the server where we host the website).
What Pingdom Tools does is to make a load of the website and then go marking the elements that are loaded, giving us relevant data about the loading times of each element and even if any element gives error 404 or makes a redirection 301. For this reason (element by element) Pingdom Tools is a good tool to solve loading problems on any website, in addition to an excellent tool to measure the loading speed.
But the good thing about Pingdom Tools is what it shows at the bottom of the test. What I commented before the loading of the elements and also the system of tips that helps us know what we must improve more or less to get our website load faster to solve bottlenecks:
You can use Pingdom Tools from the tool’s website: https://tools.pingdom.com/
GTmetrix
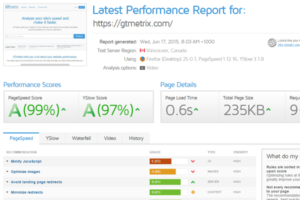
Although I use Pingdom Tools, many webmasters use GTMetrix, as it is a much more powerful alternative for some things, although the information is much more difficult to interpret (at least to my understanding).
Although Pingdom Tools has a system of “tips” to improve the loading speed of our website, I have to recognize that the GTMetrix system is superior and offers much more information.
The only problem that GTMetrix has in its free version, is that it does not allow to choose the location from where the load test is done. Something that limits its possibilities and deceives people who use the tools and do not know how to interpret their data or do not understand what latency is.
The information offered by GTMetrix is very varied, as in addition to the tips also shows the loading scheme as shown by Pingdom Tools:
You can use GTMetrix from the tool’s own web page: https://gtmetrix.com/
Google PageSpeed Insights

Although we will not go into depth on Google PageSpeed Insights and the score it offers, as this is a matter of another article, many webmasters still use reference to measure the speed of a website, the score of Google PageSpeed Insights and…. ERROR.
Google PageSpeed Insights offers a score based on rules predefined by Google, but these rules have no basis, they can be defined as “good practices” but NEVER NEVER determine the speed. Says someone who has seen pages with 40/100 PageSpeed and 0.3 seconds loading time.
Although there has been much talk that Google takes into account the Google PageSpeed Insights score for SEO positioning, this does not mean that a good score equals a good speed, rather it equals that we do what Google tells us to keep him happy.
On the other hand, there is something else and, in most cases, if we follow to the letter what the Google PageSpeed Insights advice tells us, what we will get is to dismantle the web completely and finally is not usable, since we must dispense with many dynamic elements that improve usability.
From this URL you can test your web in Google PageSpeed Insights: https://developers.google.com/speed/pagespeed/insights/
As I said, in this article we are not going to show how to use Google PageSpeed Insights or how to interpret what it asks of us, as that is a matter of another article, but I just wanted to make it clear that this tool exists and that we can use it if we know how to correctly apply the information it offers us.
ByteCheck

This tool is much less well known, since it only serves to test the first byte of a website’s load, that is, how long it takes to receive the first data from the website and from there all the elements of the website are loaded.
The tool is very simple, just fill in the field and analyze the web introduced.
The data that it offers us has the following appearance:
In this case the logic is simple, the faster the better.
You can improve the response time by using an effective cache system or by using efficient web servers such as Nginx, or proxy cache systems such as Varnish to serve requests.
You can find more information about ByteCheck at the following URL: http://www.bytecheck.com/
WordPress Cache Plugin

We consider that cache plugins are something very basic to improve the loading speed of any website, in fact, loading WordPress without cache is slowed much to have to process the PHP code for each visit that enters the website, which makes a cache system is essential.
We have talked a lot about WordPress cache systems in plugin format, even in the past we have done a performance benchmark of WordPress cache plugins where we showed that WP Rocket is the best response times.
What a cache plugin does is save a processed copy of the website (in the case of page caches). Then it serves that already processed copy to all visitors, which saves us a lot of processing power (in the form of server resources or hosting) and also allows us to drastically reduce waiting times when serving requests.
We normally rely on several WordPress cache plugins. On the one hand we use the Premium WP Rocket alternative and as free alternatives we use W3 Total Cache or WP Fastest Cache.
This does not mean that they are the best cache plugins for WordPress, but they have been the ones that have given us the best results in the tests and experiments that we have done with websites in production.
On the other hand, there are many options when caching WordPress, in fact, there are plugins that allow us to cache specific parts and there are cache plugins that are recommended for specific environments where we find certain conditions on the ground.
WP Rocket for WordPress
As we have said before, WP Rocket is a very powerful plugin that offers brutal response times, although it has two disadvantages; on the one hand it is a Premium plugin and that for many people is a drawback, and on the other hand, it only offers page cache. Meanwhile, its alternative (W3 Total Cache) offers object cache, database query cache and page cache.
WP Rocket also includes optimization, minify and combined CSS and JS functionalities, with the advantage that it has specialized technical support.
In case the plugin has some kind of incompatibility with our theme, we can solve it by contacting technical support to fix it (and in most cases fix it).
W3 Total Cache for WordPress
W3 Total Cache is a complete optimization suite for WordPress, and despite being the most complete cache plugin that exists for WordPress, the free version is fully functional and we can use it without any problem on any WordPress website.
W3 Total Cache allows you to perform page cache, object cache, MySQL database query cache and even manage the cache stored by OPCache.
W3 Total Cache has changed a lot lately, it has advanced and new functionalities have been included that we can take advantage of to make our WordPress work much faster.
If we had to highlight the functionalities and features of W3 Total Cache, we would name the following:
Page cache with the possibility of saving it to disk or to a cache system like Memcached.
Database query cache with the possibility of saving the cache to disk or to a cache system such as Memcached.
Object cache with the possibility of saving the cache to disk or to a cache system such as Memcached.
System to implement Domain Sharding or a CDN, with compatibility for the CDN more known as Amazon CloudFront.
System optimization of the generated code: optimize, combine and minify the HTML code, CSS and JS.
As you can see in the previous features, W3 Total Cache is a very complex system, it offers many more possibilities and configurations than the other cache plugins that exist for WordPress.
It is a plugin recommended for websites with a lot of traffic hosted on complex infrastructures where we can use systems such as Memcached, with cache distributed on several machines.
WP Fastest Cache for WordPress
We consider that WP Fastest Cache is an excellent option as an alternative to WP Rocket, since WP Rocket being Premium (paid) can be an inconvenience for many users who do not consider their project so important as to buy a license for this plugin.
WP Fastest Cache is also a very powerful plugin, able to serve the page cache very fast, but unlike other alternatives, WP Fastest Cache only allows page cache and saved to disk.
In addition to allowing page caching on disk, it also includes the necessary tools to combine and minify HTML, CSS and JS code.
On the other hand, it gives us the possibility of activating GZIP compression on Apache web servers that interpret .htaccess and also allows us to easily implement some types of CDN.
WP Fastest Cache has a free version and a paid version. The free version is fully usable and has no cache limitations.
Other WordPress Cache Plugins
The cache plugins we talked about above are recommended in most cases, as they are common and can normally be used in most circumstances, regardless of W3 Total Cache being the recommended option for complex websites where we can use object cache systems in RAM such as Memcached.
There are many more cache plugins, some specialized in caching some specific areas of a website, such as widgets or menus.
The idea is to know how each cache plugin works, see its strengths and decide which ones we use in the project based on the needs of the project and what we can solve with each plugin.
WP Speed of Light for WordPress
I want to mention WP Speed of Light because its developers (Joomunited) always create high quality plugins that help a lot and totally free, such as WP Meta SEO.
WP Speed of Light is a complete plugin that allows multiple actions from the WordPress interface. All with the aim of improving the loading speed of the WordPress website using automated WPO techniques.
WP Speed of Light is not only a cache plugin, but also allows us to optimize, combine and minify the HTML, CSS and JS code generated, as well as allowing us to activate GZIP compression and manage the browser cache configuration.
Nix Gravatar Cache for WordPress
Although it’s not exactly a cache plugin, I want to comment on what it’s used for, as it’s been helpful in some blogs that use WordPress default commenting and load avatars from Gravatar.
The function of Nix Gravatar Cache is to keep a cached copy on our web hosting of Gravatar avatars. This will go a long way towards improving loading speed in situations where Gravatar servers are not going as fine as they should be.
What this plugin allows is to reduce external HTTP requests. It reduces external DNS requests and also enables the cache browser for avatars.
Output Cache Widget for WordPress
Widget Output Cache is a plugin that, as its name indicates, allows us to cache widgets that are loaded in a WordPress installation, improving the loading of the web when the problem we have is that very complex widgets slow down the load and cause waits or high resource consumption.
Normally, when we are forced to cache widgets is for some specific reason that affects just these elements.
In the case of Widget Output Cache the cache of widgets is saved to disk and does not allow to save the temporary cache in another location.
Menu Cache for WordPress
Sometimes we come across WordPress websites with heavy dropdown menus that can cause problems when loaded.
For these complex cases there are plugins such as Menu Cache, a free plugin for WordPress that allows us to cache the menus, saving the elements in a site easier to access than the database.
Memcached Redux for WordPress
Memcached Redux is a simple plugin, in fact it does not even have a graphical interface and the installation is necessary to do it completely manually.
Memcached Redux allows us to use Memcached to cache objects from WordPress. We can even configure to use several Memcached servers.
Memcached Redux is the plugin recommended by the developers of WP Rocket, something to keep in mind when choosing a good plugin to use Memcached with WordPress effectively.
In order to use Memcached Redux and connect to a Memcached server, the web server running PHP must have the php_memcached extension active.
Image optimization in WordPress
Most internet websites have a serious problem with images. Most content authors or webmasters upload images without paying attention to image size or weight, causing significant load slows and abusive bandwidth consumption.
If you had to choose the first point of the checklist of checks when optimizing a WordPress, the first point would undoubtedly be the optimization of images, because it is something that NEVER fails, ie, ALWAYS are not optimized or have been uploaded without any control.
We can optimize the images before uploading them or after uploading them, is a decision of the author of the content and tools available.
If you want to optimize images before uploading you can do so with tools known as Photoshop, but also with online tools such as Kraken.io.
As for the optimization after uploading images to WordPress we can do it with some plugins, among which we will highlight, Imagify as a Premium alternative and EWWW Image Optimizer and WP Smush as free alternatives to optimize images.
EWWW Image Optimizer for WordPress
For us, EWWW Image Optimizer is the most reliable free alternative in plugin format, as it includes all the libraries needed to optimize images without relying on external services, that is, directly on the server itself (although this means a much higher consumption of resources during the process).
EWWW Image Optimizer is used to optimize PNG, JPEG and GIF images automatically, both for uploaded images and to automate the optimization of images when uploaded.
Imagify for WordPress
Imagify is a project of the developers of WP Rocket. For me it’s a very powerful solution, one of the most powerful and efficient image optimization systems for WordPress that we’ve seen, because at equal compression, images lose almost no quality unless you specify the maximum level of optimization.
Unlike EWWW Image Optimizer, which optimized images directly on the server itself, Imagify relies on a cloud service to optimize images, which reduces resource consumption on the server and speeds up optimization.
It is necessary to specify that Imagify is a payment plugin, it does not require the payment of a license, but is paid per use based on the optimized megabytes or gigabytes.
If I have to give my opinion, as I said before, Imagify is the most recommendable option I know if we want efficiency when optimizing the images of our website automatically.
You can find more information about Imagify for WordPress at the following URL: https://imagify.io/
WP Smush for WordPress
WP Smush is a plugin that has changed its developer and name over time, since it used to be called WP SmushIt.
Right now the development of WP Smush is a matter of the people of WPMU DEV, which has caused a change of image “corporate” and another change of name, now called “Smush Image Compression and Optimization” and brings the new image of WPMU DEV when integrated into its stack of free plugins.
WP Smush is similar to Imagify and different to EWWW Image Optimizer, as it optimizes the images by uploading them to an external service. But in this case the problem is that the free version of the plugin has the maximum limitation of 1 MB per image, ie can not optimize images larger than 1 MB.
Some features of WP Smush are limited in the free version, such as advanced optimization (more powerful and effective) and automatic backup of images before optimization.
Imsanity for WordPress
Imsanity is a plugin for resizing images, but not for optimizing. Still I like to mention it because it allows to resize images automatically when uploading, this solves the problem that many authors and webmasters have when uploading images to WordPress without looking at their size.
It should be noted that many times the uploaded images are shown in a much larger size because they are resized with code, but really the image is still large and heavy, this is solved with Imsanity for WordPress.
Imsanity really does nothing more than automate, because to resize the images are used the features built into WordPress itself.
Imsanity combines very well with an image optimization plugin such as Imagify or EWWW Image Optimizer.
It is important to disable automatic image optimization in these, so that images are first resized when uploaded using Imsanity and then optimized with another plugin.
Optimize HTML, CSS and JS: minify and combine
The concept of minifying and combining HTML, CSS and Javascript files is simple, it allows us to get fewer and smaller files, simplifying to a greater or lesser extent the loading of the website.
Minimizing consists of removing from the text files that are served to visitors (HTML, CSS and Javascript files) all the elements that are not necessary for the interpretation of the web by browsers, such as blank spaces, line breaks or comments in the code.
Combine consists of joining two or more files of the same type into a single file, achieving a reduction in the number of requests needed to load the web.
If we combine and minify the files we will achieve what we said at the beginning, make the files smaller and have fewer files, which will lower the number of requests and at the same time the overall weight of the web.
If we manage to minify and combine well the HTML, JS and CSS files of our website we will also experience important improvements in terms of the crawl budget of our website, with the corresponding improvement in SEO by improving the indexation by search engine bots.
In addition, minifying and combining is not the only thing we can do with CSS and JS, as we can also configure the asynchronous load or embed the inline CSS in the HTML code generated from the website:
Asynchronous loading: This is a technique by which we can load several elements at the same time asynchronously, instead of waiting for one to load one after the other as would be done in synchronous loading. It really works to improve loading speed…
CSS inline: This technique allows us to insert the CSS code directly into the generated HTML code.
This is all very nice, isn’t it? Yes, it is very nice, you get improvements in loading speed, usability and SEO, but none of the techniques mentioned above is easy to implement completely and efficiently.
If you are not a programmer, it is very difficult to minify and combine CSS and Javascript code manually, as you need advanced knowledge. It is also not easy to manually configure the asynchronous load and embed the CSS inline. You need programming skills to do this.
But these WordPress techniques can also be applied automatically using plugins.
Precisely we are going to explain it to you in this section of the article, since it would not be feasible to explain it in a manual way, since each theme is different and therefore each web project is completely different.
The problem of applying these techniques through plugins is that the automated method does not always work, in fact most of the time if we activate all the options offered by plugins of this type, we will dismantle the whole web, because as I said before, neither all themes are the same nor all web projects are the same.
Autoptimize for WordPress
Autoptimize has eventually become a typical WordPress plugin.
I think that of all the plugins that allow us to optimize the code, it is the best known and also one of the most complete and configurable.
Autoptimize structures its configuration in 3 main blocks and a fourth block destined to configure the static files optimized by Autoptimize to load through a subdomain, applying something similar to what we explained in the case of Domain Sharding or parallel load.
WP Rocket to minify and combine
WP Rocket besides being an excellent cache plugin for WordPress, also includes a module with options for combining, minifying and optimizing HTML, CSS and JS code.
Although this is not a very powerful option to perform this task, we must remember that WP Rocket is a premium plugin and has a very good technical support that will help us in case we have a problem with any of the features available in WP Rocket, including combined and minified.
WP Rocket also allows to optimize the way Google Fonts are loaded in our website.
In some cases external fonts are the cause of poor loading speed due to delays caused by loading from slow external servers.
WP Rocket allows to configure some more things of its minified and combined function..
W3 Total Cache for minifying and combining
W3 Total Cache’s code optimization system is one of the most powerful I’ve ever encountered, but it’s also one of the most difficult to configure I’ve ever encountered. I have to say that I have never seen all the options of minify, combined and optimized CSS code and JS W3 Total Cache activated at once without the page being broken.
It’s a too advanced plugin that even lets the user select which “engine” he wants to minify the files with.
But that’s not all, since the minified and combined files that are generated can be saved in a cache of objects in RAM as Memcached so that all access is much faster.
In the “General Settings” of W3 Total Cache we can find this:
Later, we can go to the “Minify” section of the W3 Total Cache configuration and we will be able to access all the configuration or exclusion options that W3 Total Cache has to optimize the CSS and JS files served to visitors:
It is a very dense configuration section and as I said before, I still need to see a normal WordPress website (ie complex and with all the features it should have) working properly while squeezing the maximum possibilities of W3 Total Cache in this regard.
WP Fastest Cache for minifying and combining
Like the two previous cases, WP Fastest Cache is not just a cache plugin for WordPress either. It has more functionalities than the cache, both in its free version and in its paid Premium version.
WP Fastest Cache allows you to optimize, combine and minimize HTML, CSS and Javascript using simple options, but at the same time not very configurable, at least in the free version.
Async JS and CSS for WordPress
The Async JS and CSS plugin for WordPress is quite simple, it is similar to Autoptimize but has some less functionality and some more functionality.
Async JS and CSS allows you to configure javascript and CSS to load in asynchronous mode, something that really has important advantages as described above.
On the other hand, it also allows you to change the way CSS stylesheets are loaded, so that they are loaded online, i.e. inside the HTML code.
It also allows to minify the CSS code and remove query strings, the latter can also be done with a simple function in the functions.php of the active theme.
If you are looking for a plugin to configure the asynchronous loading of javascript and CSS, this can be your plugin. It also allows you to configure exceptions in case any of the files cause an error in the load when configured to load asynchronously.
JS & CSS Script Optimizer for WordPress
JS & CSS Script Optimizer for WordPress
JS & CSS Script Optimizer is similar to Autoptimize, in fact it also has a good cache system of optimized elements, but JS & CSS Script Optimizer is very customizable in how much we choose the scripts and style sheets we want to manipulate.
I personally like JS & CSS Script Optimizer and the options it offers, but I’ve never tried it in any production installation so I can’t tell how it behaves on websites with varied configurations.
CDN systems for WordPress
In the beginning, CDN services were only used for large websites where a lot of content needed to be served quickly and the main server(s) needed help to serve all the content. Many large portals and websites such as Youtube or large blogs such as Mashable use CDN services to serve their content much more efficiently.
A CDN service allows us to serve static and heavier content such as images, from points of presence or servers located in geographic locations close to the visitor who is accessing the website. With this we reduce a lot the latencies between the visitor and the server and therefore the web will download much faster.
In fact, with a CDN system, there are several servers that serve the content, using as logic, to serve it from the nearest available data center to the visitor.
There are several CDN
The advantages of a CDN on a website are these:
- The latencies between the visitor and the server are reduced and thus the overall download time of the website is reduced.
- It increases the margin we have when mitigating traffic spikes, since the CDN will assume the extra bandwidth used.
- The load on the main server will drop, as it will not have to serve static files and will simply have to process and serve the web.
- CDNs that work as inverse proxies such as CloudFlare allow you to have the web online at all times, as they cache the web and have a static copy always ready to serve.Each CDN service has its advantages and disadvantages, that is to say, not all of them use the same points of presence located in the same sites.
CDN77
CDN77 is a fairly stable, very powerful and POP-intensive CDN service. It benefits a lot the traffic from Latin countries, since it has 5 points of presence in Latin America, none of its competitors has so many.
We love CDN77 and it’s not too expensive either, it’s a CDN with a lot of functionalities and it works quite well for the price it has, besides it can work both by “push” and by “pull”.
KeyCDN
KeyCDN is also another quite powerful CDN, in fact We believe that more or less this to the same level that CDN77 in terms of efficiency, but it has many more functionalities. Although it has fewer points of presence in Latin America, it compensates by being much more flexible and functional.
In price KeyCDN and CDN77 are more or less the same, although for users who are starting out or have less knowledge, perhaps KeyCDN is more recommendable.
MaxCDN
MaxCDN is another CDN that we tested for a while on this same website, we didn’t like it too much as the payment model changes in relation to other CDNs like KeyCDN or CDN77.
MaxCDN is limited, as there is a fixed monthly minimum payment and that only allows you to consume 100 GB of transfer. From then on, you must buy a 1TB bonus, which can be quite expensive if you don’t consume so much, for example if you consume only 120 GB per month it would be very expensive.
MaxCDN has another problem, and that is that it is not very prepared for Latin traffic, since they only have one point of presence in Latin America, and the problem is that that point of presence is not used much either, since the content is normally served from the points of presence in the U.S… In short, it is as if MaxCDN has no presence in Latin America and only has a presence in the US.
The only thing I can say in favor of MaxCDN is that it is a very stable service. In Europe and USA it is effective and its interface has many functionalities.
Amazon CloudFront
Amazon CloudFront is a very powerful CDN service included in the Amazon AWS stack, i.e. Amazon Cloud services. It is a very powerful CDN that allows advanced configurations and is also not the most expensive, the only problem is that it is complicated to configure for inexperienced users.
If we use Amazon AWS to host our website and combine Amazon S3 with Amazon CloudFront we can create very powerful scalable environments and be prepared for very uncontrolled traffic spikes. On the other hand, even if we are hosted by another provider, if we combine Amazon CloudFront with Amazon S3 we can create quite scalable environments. We only need to use the W3 Total Cache plugin in WordPress to configure static content synchronization.
In terms of points of presence, Amazon CloudFront is not one of the worst either, as it has a good presence in most areas of the planet, highlighting Europe and the U.S., but without neglecting Latin America.
CloudFlare
CloudFlare is different from most CDN services, I only know one similar CDN, it’s called Incapsula CDN. CloudFlare works as an inverse proxy, that is, it puts itself in front of the website and stores in its cache static resources of the website and can even save a cached copy of the whole website, since in the background CloudFlare is Nginx.
The CloudFlare network is one of the largest on the planet, that is, it is one of the CDNs that have more data centers around the world, we can see in this map:
CloudFlare is not just a CDN, it has HTML, CSS and Javascript optimization functionalities, as well as functionalities related to security and the detection and mitigation of attacks of various types, including DDOS attacks.